tokyotyrant的几种同步方式

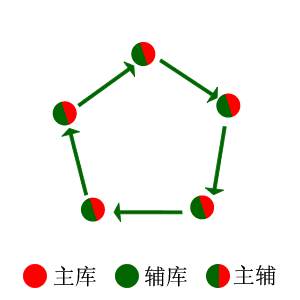
tokyo tyrant采用的是从机向主机拉式的主从同步策略,并且有一个限制,一个从库只能从一个主库同步数据。另外tokyo tyrant在写操作的时候都会加锁。这样对同一个key的写操作就会被顺序执行,不会出现并发操作的情况。且主辅库均可进行读写操作。

下面是几种同步策略:

1.

2.

3.

关于tokyotrant的遍历

如下的遍历方式效率是比较低的:
1. 因为是用的迭代的方式,所以内存使用很少
2. 迭代的过程如下,效率是非常地的:
    sendto(3, "\310Q", 2, 0, NULL, 0)       = 2  (continue)
    recvfrom(3, "\0\0\0\0CTGT-MTI5NjI0OTk5MA==-130492"…, 65536, 0, NULL, NULL) = 72 (接收key)
    sendto(3, "\3100\0\0\0CTGT-MTI5NjI0OTk5MA==-13049"…, 73, 0, NULL, 0) = 73 (get key)
    recvfrom(3, "\0\0\0\0L{\"uid\":\"1296249990\",\"et\":13"…, 65536, 0, NULL, NULL) = 81  (接收value)

测试脚本:


  1. <?php
  2.         $tt = new TokyoTyrant();
  3.         $connected = $tt->connect($host$port);
  4.         $it = $tt->getIterator();
  5.         foreach ($it as $key=>$val) {
  6.         
  7.         } 

PHP异步并发connect

以前写过一个multi_http()的函数,就是异步地做http请求,后来再次看那段代码的时候,发现不少问题:
1. 我只在发送、接受数据的时候使用了异步,connect的时候还是同步的
2. 由于我发送数据的时候使用的是http1.0,所以接受数据的时候靠feof()判断结束就很方便了;如果使用http1.1,而且connection:keep-alive; 那么就不是那么简单了

如果需要异步并发,建议使用curl,今天看了一下,curl在异步并发请求的时候,connect、send、recv都是异步的。测试代码:

muti_curl.php
  1.     
    <?php


  2.     
    // 创建一对cURL资源


  3.     
    $ch1 = curl_init();


  4.     
    $ch2 = curl_init();


  5.     


  6.     
    // 设置URL和相应的选项


  7.     
    curl_setopt($ch1, CURLOPT_URL, "http://phpor.net/tools/whoami.php");


  8.     
    curl_setopt($ch1, CURLOPT_HEADER, 0);


  9.     
    curl_setopt($ch2, CURLOPT_URL, "http://phpor.net/tools/whoami.php");


  10.     
    curl_setopt($ch2, CURLOPT_HEADER, 0);


  11.     


  12.     
    // 创建批处理cURL句柄


  13.     
    $mh = curl_multi_init();


  14.     


  15.     
    // 增加2个句柄


  16.     
    curl_multi_add_handle($mh,$ch1);


  17.     
    curl_multi_add_handle($mh,$ch2);


  18.     


  19.     
    $active = null;


  20.     
    // 执行批处理句柄


  21.     
    do {


  22.     
            $mrc = curl_multi_exec($mh, $active);


  23.     
    } while ($mrc == CURLM_CALL_MULTI_PERFORM);


  24.     


  25.     
    while ($active && $mrc == CURLM_OK) {


  26.     
            if (curl_multi_select($mh) != 1) {


  27.     
                    do {


  28.     
                            $mrc = curl_multi_exec($mh, $active);


  29.     
                    } while ($mrc == CURLM_CALL_MULTI_PERFORM);


  30.     
            }


  31.     
    }


  32.     


  33.     
    // 关闭全部句柄


  34.     
    curl_multi_remove_handle($mh, $ch1);


  35.     
    curl_multi_remove_handle($mh, $ch2);


  36.     
    curl_multi_close($mh);


使用strace观察一下:
strace -tt php multi_curl.php

connect(3,{sa_family=AF_INET,sin_port=htons(80), sin_addr=inet_addr("66.147.244.189")}, 16) = -1 EINPROGRESS (Operation now in progress)
poll([{fd=3, events=POLLOUT}], 1, 0)    = 0

虽然是异步,这里还是立即检查了一下是否已经连接成功;但是这种检查也是非阻塞的(看poll的第三个参数)。如果connect连接的是本地端口,poll检查的时候连接就已经是成功的了。 如(10.55.38.14是本机):
connect(4, {sa_family=AF_INET, sin_port=htons(80), sin_addr=inet_addr("10.55.38.14")}, 16) = -1 EINPROGRESS (Operation now in progress)
poll([{fd=4, events=POLLOUT, revents=POLLOUT}], 1, 0) = 1

——————————————
下面这篇文章写的并不好,仅作学习之用:

这里关键是socket_select的用法了;
另:
1. 当阻塞方式connect的时候,设置连接超时时间是通过设置SO_SNDTIMEO来实现的,如:
socket_set_option($socket, SOL_SOCKET, SO_SNDTIMEO, array(‘sec’ => 3, ‘usec’ => 0));
设置超时时间为3s;
2. 对于非阻塞方式的connect,连接的超时时间不是在socket上设置的,而是自己控制循环的时间

multi_connect.php
  1.     
    <?php


  2.     


  3.     
    $arrTarget = array(


  4.     
        array("host"=>"10.55.38.61", "port"=>80),


  5.     
        array("host"=>"66.147.244.18", "port"=>80),


  6.     
        array("host"=>"10.55.38.63", "port"=>82),


  7.     
    );


  8.     
    $arrResult = multi_connect($arrTarget);


  9.     


  10.     
    print_r($arrResult);


  11.     
    exit;


  12.     


  13.     
    function multi_connect($arrTarget) {


  14.     
        $arrSocket = array();


  15.     
        foreach($arrTarget as $key=>$pair) {


  16.     
            $socket  = socket_create(AF_INET, SOCK_STREAM, SOL_TCP);


  17.     
            socket_set_nonblock($socket);


  18.     
            @socket_connect($socket, $pair["host"], $pair["port"]);


  19.     
            $arrSocket[$key] = $socket;


  20.     
        }


  21.     
        $arrLeft = $arrSocket;


  22.     
        $arrSocketWrite = $arrSocket;


  23.     
        $arrSocketRead = null;


  24.     
        $arrExcept = array();


  25.     
        $all = count($arrTarget);


  26.     
        $arrOk = array();


  27.     


  28.     
        $timeout = 5;


  29.     
        $oritimeout = $timeout;


  30.     


  31.     
        while($all > 0 && $timeout > 0) {


  32.     
            $time_start = time();


  33.     
            $done = socket_select($arrSocketRead, $arrSocketWrite,$arrExcept,$timeout);


  34.     
            $timeout -= (time() $time_start);


  35.     
            if ($done <= 0) {


  36.     
                //error or timeout


  37.     
                echo "Timeout $oritimeout(s)n";


  38.     
                break;


  39.     
            }


  40.     
            $all -= $done;


  41.     


  42.     
            foreach($arrSocketWrite as $key=>$val) {


  43.     
                $arrOk[$key] = $val;


  44.     
            }


  45.     
            $arrLeft = array_diff($arrLeft, $arrSocketWrite);


  46.     


  47.     
            echo "n—-connect ok:——————–n";


  48.     
            print_r($arrSocketWrite);


  49.     
            echo "n—-except:——————–n";


  50.     
            print_r($arrExcept);


  51.     
            echo "n–left:———————-n";


  52.     
            print_r($arrSocketWrite);


  53.     


  54.     
            echo "n====================================n";


  55.     


  56.     
            $arrSocketWrite = $arrLeft;


  57.     


  58.     
        }


  59.     
        return $arrOk;


  60.     
    }


善用配置

关键字: 配置文件、日志、默认值

我们总期望程序功能很强大,但是有些功能不是适合任何环境的、任何时候的,这时候我们就可以利用配置来使得灵活。
比如:
我想方便地看到线上程序的一些调试信息,但是一般情况下我并不需要这些信息,只有在调试线上bug的时候才需要,于是我们就可以在程序中添加这些调试信息的语句,然后通过开关来控制。
如果我们没有权限登录线上提供服务的机器,则调试信息就可能需要输出到自己可以登录的某远程server上了,然而,很多提供服务的机器都往一个机器上打log,如果没有控制,这个log server估计会吃不消了,于是我们就可能需要配置一些有百分之多少的请求是需要打log的,这里就又用到了配置。
另外,还有日志的级别也是可以配置的。

所以,写一套系统,一定要有:
1. 配置文件类
  什么配置信息都可以从通过配置文件类来获取;或许你不愿意配置这些东西,你们你设置默认值就行了
2. 日志类
  日志有级别,也有标签;我可以输出某种级别的日志,也可以只输出含有某标签的日志; 或许你不想输出这些东西,你们你默认不输出就行了

使用dnsmasq架设一个自己的dns server

下载地址: http://www.thekelleys.org.uk/dnsmasq/dnsmasq-2.57.tar.gz
帮助文档: https://help.ubuntu.com/community/Dnsmasq


配置文件:/etc/dnsmasq.conf


关于Memcached的认证支持

Memcached 1.4.5里面通过sasl提供了认证支持,编译的时候可以启用该功能,编译参数:
[memcached-1.4.5]# ./configure –help| grep -i sasl
  –enable-sasl           Enable SASL authentication
  –enable-sasl-pwdb      Enable plaintext password db

SASL全称Simple Authentication and Security Layer,是一种用来扩充C/S模式验证能力的机制;

关于sasl:
参考文档:http://tools.ietf.org/html/rfc4422
c库实现: http://asg.web.cmu.edu/sasl/sasl-library.html
GNU libgsasl实现: http://www.gnu.org/software/gsasl/
其它资料:
http://asg.web.cmu.edu/sasl/

Memcached-1.4.5的一些新特性

memcached 1.2.8

-p <num>      TCP port number to listen on (default: 11211)

-U <num>      UDP port number to listen on (default: 11211, 0 is off)

-s <file>     unix socket path to listen on (disables network support)

-a <mask>     access mask for unix socket, in octal (default 0700)

-l <ip_addr>  interface to listen on, default is INDRR_ANY

-d            run as a daemon

-r            maximize core file limit

-u <username> assume identity of <username> (only when run as root)

-m <num>      max memory to use for items in megabytes, default is 64 MB

-M            return error on memory exhausted (rather than removing items)

-c <num>      max simultaneous connections, default is 1024

-k            lock down all paged memory.  Note that there is a

              limit on how much memory you may lock.  Trying to

              allocate more than that would fail, so be sure you

              set the limit correctly for the user you started

              the daemon with (not for -u <username> user;

              under sh this is done with ‘ulimit -S -l NUM_KB’).

-v            verbose (print errors/warnings while in event loop)

-vv           very verbose (also print client commands/reponses)

-h            print this help and exit

-i            print memcached and libevent license

-P <file>     save PID in <file>, only used with -d option

-f <factor>   chunk size growth factor, default 1.25

-n <bytes>    minimum space allocated for key+value+flags, default 48

-R            Maximum number of requests per event

              limits the number of requests process for a given con nection

              to prevent starvation.  default 20

-b            Set the backlog queue limit (default 1024)

——————————————————————-


memcached 1.4.5

-p <num>      TCP port number to listen on (default: 11211)

-U <num>      UDP port number to listen on (default: 11211, 0 is off)

-s <file>     UNIX socket path to listen on (disables network support)

-a <mask>     access mask for UNIX socket, in octal (default: 0700)

-l <ip_addr>  interface to listen on (default: INADDR_ANY, all addresses)

-d            run as a daemon

-r            maximize core file limit

-u <username> assume identity of <username> (only when run as root)

-m <num>      max memory to use for items in megabytes (default: 64 MB)

-M            return error on memory exhausted (rather than removing items)

-c <num>      max simultaneous connections (default: 1024)

-k            lock down all paged memory.  Note that there is a

              limit on how much memory you may lock.  Trying to

              allocate more than that would fail, so be sure you

              set the limit correctly for the user you started

              the daemon with (not for -u <username> user;

              under sh this is done with ‘ulimit -S -l NUM_KB’).

-v            verbose (print errors/warnings while in event loop)

-vv           very verbose (also print client commands/reponses)

-vvv          extremely verbose (also print internal state transitions)

-h            print this help and exit

-i            print memcached and libevent license

-P <file>     save PID in <file>, only used with -d option

-f <factor>   chunk size growth factor (default: 1.25)

-n <bytes>    minimum space allocated for key+value+flags (default: 48)

-L            Try to use large memory pages (if available). Increasing

              the memory page size could reduce the number of TLB misses

              and improve the performance. In order to get large pages

              from the OS, memcached will allocate the total item-cache

              in one large chunk.

-D <char>     Use <char> as the delimiter between key prefixes and IDs.

              This is used for per-prefix stats reporting. The default is

              ":" (colon). If this option is specified, stats collection

              is turned on automatically; if not, then it may be turned on

              by sending the "stats detail on" command to the server.

-t <num>      number of threads to use (default: 4)

-R            Maximum number of requests per event, limits the number of

              requests process for a given connection to prevent 

              starvation (default: 20)

-C            Disable use of CAS

-b            Set the backlog queue limit (default: 1024)

-B            Binding protocol – one of ascii, binary, or auto (default)

-I            Override the size of each slab page. Adjusts max item size

              (default: 1mb, min: 1k, max: 128m)

对于新的版本,增加了多线程处理机制,这样设定可能会提高memcache官方提供95%的命中率的问题。

对于memcache的使用,尽量使用内网,减少服务器连接的时间。

对于高并发的处理,memcache如果效果不太理想,可以尝试使用magent,memcache负载均衡。

关于Memcache长连接自动重连的问题

使用PHP的memcache模块写了一个访问tokyotrant的long-live程序,因为是long-live的,所以我就connect一次之后一直使用了,理论上我connect之后就可以一直使用,中间不会出现重新连接的问题,为了确认我的推断,启动进程之后,我用strace跟踪了一些进程,令我意外的是,隔一段时间连接就会关闭,然后重新连接,怎么回事呢?

我怀疑两个方面:
1. 我的程序有问题
2. server端有问题,用一段时间会关掉我的连接

首先,我用了大约1个小时的时间,简直把我的程序拆的支离破碎了,结果没有发现哪里有问题。
其次,我使用tcpdump观察了一下,发现主动关闭连接的不是server端,而是我的程序。
百思不得其解。这件事简直成了我的一块心病。

隔了一段时间,当我再次使用tcpdump观察的时候,结果如下:
1.   21:27:20.273522 IP 10.55.38.62.60953 > 10.55.38.70.2004: . ack 132 win 501 <nop,nop,timestamp 3026990738 3683027032>
2.  21:27:20.273757 IP 10.55.38.62.60953 > 10.55.38.70.2004: P 20:142(122) ack 132 win 501 <nop,nop,timestamp 3026990738 3683027032>
3.  21:27:20.273871 IP 10.55.38.70.2004 > 10.55.38.62.60953: . ack 142 win 255 <nop,nop,timestamp 3683027032 3026990738>
4. 21:27:21.273955 IP 10.55.38.62.60953 > 10.55.38.70.2004: F 142:142(0) ack 132 win 501 <nop,nop,timestamp 3026991738 3683027032>
5. 21:27:21.274038 IP 10.55.38.62.37298 > 10.55.38.70.2004: S 3948732568:3948732568(0) win 5792 <mss 1460,sackOK,timestamp 3026991738 3683027542,nop,wscale 7>
6. 21:27:21.274165 IP 10.55.38.70.2004 > 10.55.38.62.37298: S 34634952:34634952(0) ack 3948732569 win 5792 <mss 1460,sackOK,timestamp 3683028032 3026991738,nop,wscale 7>
21:27:21.274185 IP 10.55.38.62.37298 > 10.55.38.70.2004: . ack 1 win 46 <nop,nop,timestamp 3026991738 3683028032>
21:27:21.274196 IP 10.55.38.62.37298 > 10.55.38.70.2004: P 1:123(122) ack 1 win 46 <nop,nop,timestamp 3026991738 3683028032>
21:27:21.274320 IP 10.55.38.70.2004 > 10.55.38.62.37298: . ack 123 win 46 <nop,nop,timestamp 3683028032 3026991738>
21:27:21.313329 IP 10.55.38.70.2004 > 10.55.38.62.60953: . ack 143 win 255 <nop,nop,timestamp 3683028072 3026991738>
21:27:21.533806 IP 10.55.38.70.2004 > 10.55.38.62.37298: P 1:9(8) ack 123 win 46 <nop,nop,timestamp 3683028292 3026991738>
21:27:21.533822 IP 10.55.38.62.37298 > 10.55.38.70.2004: . ack 9 win 46 <nop,nop,timestamp 3026991998 3683028292>
21:27:22.604843 IP 10.55.38.70.2004 > 10.55.38.62.60953: P 132:140(8) ack 143 win 255 <nop,nop,timestamp 3683029363 3026991738>
21:27:22.604859 IP 10.55.38.62.60953 > 10.55.38.70.2004: R 3898017016:3898017016(0) win 0
21:27:24.072995 IP 10.55.38.62.37298 > 10.55.38.70.2004: P 123:143(20) ack 9 win 46 <nop,nop,timestamp 3026994537 3683028292>

============================================
我意外地发现有一个reset包,感觉很奇怪,顺着 60953 端口网上查,发现:
第2个包: 向server端发送数据
第3个包: server端回复收到数据
第4个包: 按说应该server端返回响应数据,但是这里却是client端发了一个finish包
观察第3个包与第4个包之间的时间间隔,基本是1s, 这令我想起了memcache的默认超时时间也是1s,是巧合?显然不是。因为:
第5个包: client端重新发起了连接操作
显然是超时了, 于是重连有了答案。

当然,虽然client关闭了连接,server端却还没有关闭,直到 21:27:22.604859 的时候,服务器端给出了响应数据,但是client已经关闭了,所以出现了被reset的现象。

==========================================
还有一个问题:
我的程序里面是做了容错处理的,但是我的容错策略是,如果出错了,则sleep(2);之后重新连接; 显然不符合上面的表现,怀着万般不解的心情开始看php的memcache模块的源码;
在memcache.c中:

Memcach.c
  1.     
    int mmc_pool_store(mmc_pool_t *pool, const char *command, int command_len, const char *key, int key_len, int flags, int


  2.     
     expire, const char *value, int value_len TSRMLS_DC) /* {{{ */


  3.     
    {


  4.     
        mmc_t *mmc;


  5.     
        char *request;


  6.     
        int request_len, result = 1;


  7.     
        char *key_copy = NULL, *data = NULL;


  8.     
    //…


  9.     
        while (result < 0 && (mmc = mmc_pool_find(pool, key, key_len TSRMLS_CC)) != NULL) {


  10.     
            if ((result = mmc_server_store(mmc, request, request_len TSRMLS_CC)) < 0) {


  11.     
                mmc_server_failure(mmc TSRMLS_CC);


  12.     
            }    


  13.     
        }


  14.     
      // …


  15.     
    }


  16.     


  17.     
    // ..


  18.     
    int mmc_server_failure(mmc_t *mmc TSRMLS_DC) /*


  19.     
        determines if a request should be retried or is a hard network failure {{{ */


  20.     
    {


  21.     
        switch (mmc->status) {


  22.     
            case MMC_STATUS_DISCONNECTED:


  23.     
                return 0;


  24.     


  25.     
            /* attempt reconnect of sockets in unknown state */


  26.     
            case MMC_STATUS_UNKNOWN:


  27.     
                mmc->status = MMC_STATUS_DISCONNECTED;


  28.     
                return 0;


  29.     
        }


  30.     


  31.     
        mmc_server_deactivate(mmc TSRMLS_CC);


  32.     
        return 1;


  33.     
    }


在这里,我们发现,如果store失败的话,下面会有一个容错处理,通过php -i | grep memcache 可以看到容错配置确实是打开的。
在容错的代码中明显发现做了断开连接的操作,但是在哪里重连的呢? 

这要看mmc_hash_find_server的实现了,有时间再看。。。