Exclude dash (-) from word separators in vi – Super User
bash vs sh
一般来讲,/bin/sh 都是软连接到bash的,所以,你基本上会认为 /bin/sh 和 /bin/bash 是一样的; 但事实是:不尽然
bash中有判断当前文件名的逻辑,如果是sh 就 xxx, 如果是bash 就 ***,如:
使用bash执行脚本时,函数名允许含有中划线(如: hello-world),sh执行时不允许; 注意,使用中划线定义的函数,如果要unset时,则需要使用-f选项,如: unset -f “hello-world” ; 因为如果没有-f选项,unset会尝试unset对应的变量,但是这是个不合法的变量,所以,直接退出, -f选项直接unset对应的函数
使用bash执行脚本时,支持Process Substitution , sh 执行时不支持
是不是感觉有些不爽?
还有呢,有些版本的 /bin/test 和 /bin/[ 就是同一个程序,根据文件名的不同执行不同的逻辑
参考: https://stackoverflow.com/questions/5725296/difference-between-sh-and-bash
当通过sh的方式使用bash时,基本等同于:
|
1 |
bash --posix |
虽然显得很posix,但是很多好用的东西不支持:(其中删除线部分,似乎说的不太对,也或者是我理解的不对,所以删除了)
This question has frequently been nominated as a canonical for people who try to use sh and are surprised that it’s not behaving the same as bash. Here’s a quick rundown of common misunderstandings and pitfalls.
- If you run your script with
sh scriptname, or run it withscriptnameand have#!/bin/shin the shebang line, you should expect POSIXshbehavior. - If you run your script with
bash scriptname, or run it withscriptnameand have#!/bin/bash(or the local equivalent) in the shebang line, you should expect Bash behavior.
Having a correct shebang and running the script by typing just the script name (possibly with a relative or full path) is generally the preferred solution. In addition to a correct shebang, this requires the script file to have execute permission (chmod a+x scriptname).
The Bash Reference manual has a section which attempts to enumerate the differences but some common sources of confusion include
[[is not available insh(only[which is more clunky and limited).shdoes not have arrays.- Bash has process substitution with
<(cmd)and>(cmd). - Some Bash keywords like
local,function, andselectare not portable tosh. ~refers to$HOMEonly in Bash (and more generally~usernameto the home directory ofusername).- Bash has many C-style syntax extensions like
$'string\nwith\tC\aescapes'and the three-argumentfor((i=0;i<=3;i++))loop,+=increment assignment, etc. - Bash has
*.{png,jpg}and{0..9}brace expansion. - Bash supports coprocesses with
<>redirection. - Bash supports
<<<'here strings'. - Bash has significantly extended facilities for shell arithmetic (though still no floating-point support) and variable substring manipulation.
- Many, many Bash-only extensions to enable or disable optional behavior and expose internal state of the shell.
Remember, this is an abridged listing. Refer to the reference manual for the full scoop, and http://mywiki.wooledge.org/Bashism for many good workarounds; and/or try http://shellcheck.net/ which warns for many Bash-only features.
Unfortunately, Bash will not warn when you try to use these constructs when it is invoked as sh.
总结:
知道bash和sh有差异就行了,记住所有的差异没有意义
shell 之 return
不惑: shell函数中可以使用return语句提前返回
疑惑:有些shell脚本中,函数外也会出现return;有些shell脚本中在函数外写return就执行失败
参考:
|
1 2 3 4 5 6 7 8 9 10 |
# help return return: return [n] 从一个 shell 函数返回。 使一个函数或者被引用的脚本以指定的返回值 N 退出。 如果 N 被省略,则返回状态就是 函数或脚本中的最后一个执行的命令的状态。 退出状态: 返回 N,或者如果 shell 不在执行一个函数或引用脚本时,失败。 |
解惑:
- 函数中可以使用return语句
- 被引用的脚本(就是source 或 dot 方式执行的脚本)中函数外也可以使用return; 使用 sh script.sh 方式执行的script.sh 中不能出现函数外的return语句; 即: 如果在函数外使用return语句,你要清楚你的脚本是用来被source的,而不是被 sh 的;
- 其他情况下的return语句将返回失败
php 获取数组中前N个值
如下,获取数组中的前2个元素:
|
1 2 3 4 5 6 |
bash-4.1# php -r 'print_r(array_chunk(array('a'=>1,'b'=>2,'c'=>3),2,true)[0]);' Array ( [a] => 1 [b] => 2 ) |
难道还有更方便的方法?
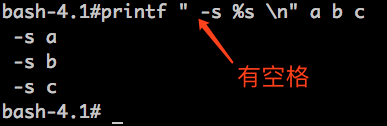
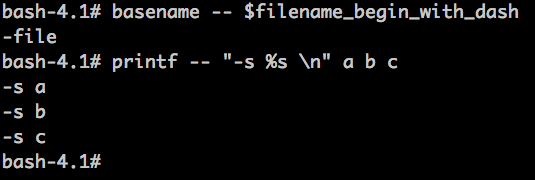
bash 小知识之 dubble dash
先看两个例子:
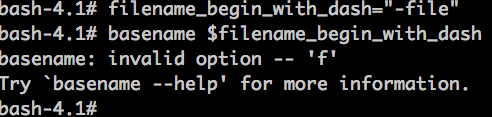

basename 和 printf 都是常用的命令,怎么还能出问题?
对于shell来讲,参数字符串可以使用引号引起来,也可以不引起来;如果单个参数中含有空格,一般会引起来; 但是,不管是否引起来,如果位于option的位置,就会尝试当做option解析,一般的option都以dash(-) 开头; 有些程序在当做option解析失败时,就会当做别的参数处理,但是有些程序就提示“无效的option”(如: 上面的basename、printf)
有些时候,我们不在意参数前面是否有一个多余的空格,则可以在dash前面添加一个空格来解决,如:
但是,有时候我们真的不想添加这个空格,而且,这一定不是一个不可逾越的“空格”,那么,正确的姿势是什么呢?
当我们不希望将参数识别为option的时候,就在该参数前面添加两个连续的中划线(dubble dash),以告诉命令option到此为止,后面的不要作为option处理了,如:
文件copy之断点copy
下载文件时,最好有断点续传的功能,免得下载了一部分断掉了导致前功尽弃,curl就支持断点续传;
文件copy时,很少有断点续传的需求,而且cp命令也没有断点续传的功能,有时候copy N 个TB的数据,中间断掉也是很不爽的,如果能支持断点copy就好了。
其实,curl也可以用于文件copy,那么也就自然可以实现断点copy的功能了,如:
|
1 |
curl -o /bigfile -C - file:///data1/bigfile |
-C 后面的 横线 意味着自动检测目标文件的大小,然后决定从哪个位置开始下载
有些时候,你可能只关心文件的某一个部分,这时候,可以使用curl 的-C来指定一个起始位置的
移动硬盘测速
https://item.jd.com/1179011.html

读速度: 60MB/s
写速度: 88MB/s
测试方法:
|
1 |
dd if=/dev/zero of=bigfile bs=10m count=1200 -oflag=direct |
|
1 |
dd if=bigfile of=/dev/null bs=10m count=1200 -iflag=direct |
linux 下载工具之 aria
有一种文件下载方式为: 把知道的下载源都组织到一个文件中(metalink,扩展名 meta4),这些下载源可以是不同的协议(http、ftp、bt等),然后就有一种工具(linux上为aria,mac上为speed download,windows上有getright 等)会参考该文件,同时从多个下载源下载该文件,这样的话,只要下载源够多,基本不会受下载源带宽限制,就看自己有多大带宽了;下载opensuse(4.1GB)使用metalink文件 紧花费了不到10分钟时间
一般来讲,多线程并行下载是不错的办法,但是同时从不同的下载源(而且是不同的下载协议)来下载,就更加疯狂了
参考资料 :
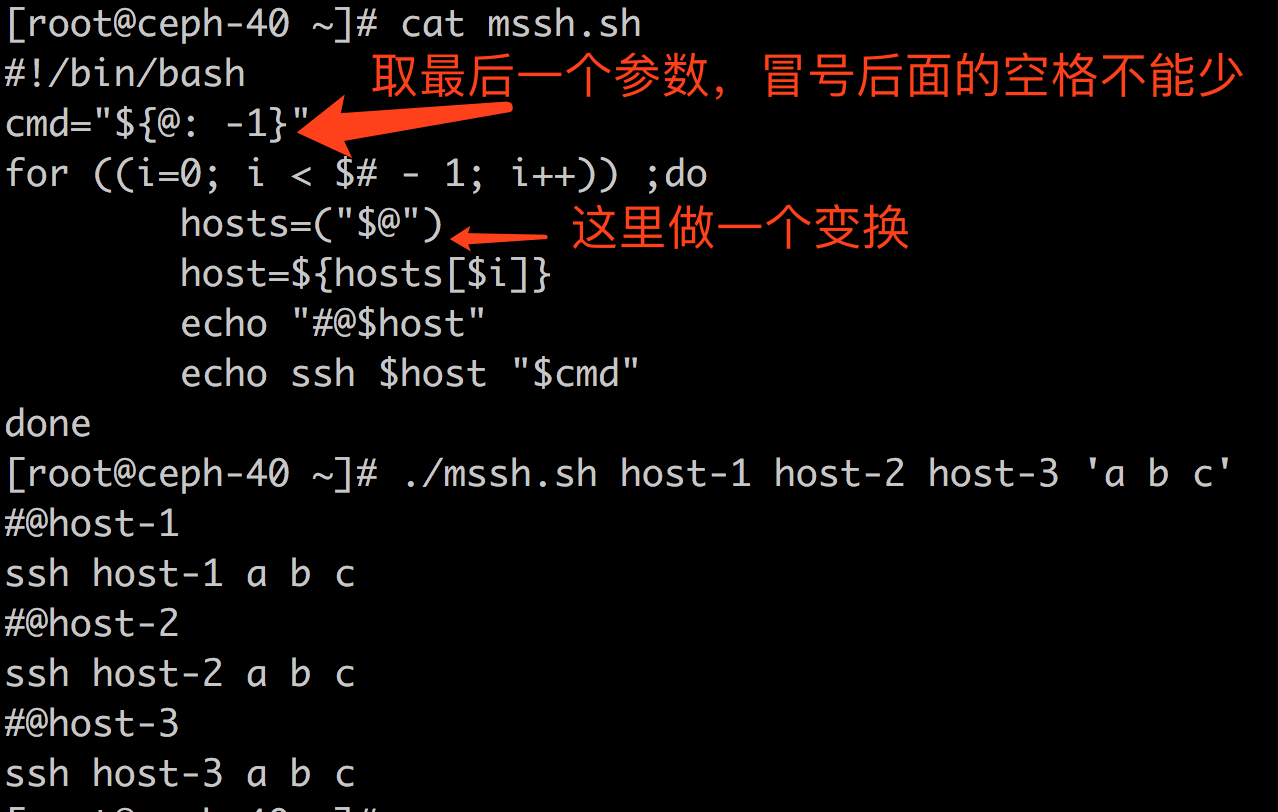
多台机器上批量执行ssh命令的小脚本
脚本:
|
1 2 3 4 5 6 7 8 9 10 |
#!/bin/bash #name mssh.sh #usage: ./mssh.sh host-1 host-2 host-3 'cmd' cmd="${@: -1}" #取最后一个参数,这里冒号后面的空格不能省略 hosts=("$@") for ((i=0; i < $# - 1; i++)) ;do host=${hosts[$i]} echo "#@$host" echo ssh $host "$cmd" done |
用法:
|
1 |
./mssh.sh host-1 host-2 host-3 'ls' |
截屏: (这里仅仅输出了要执行的命令,使用时把echo ssh中的echo去掉就好)