http://www.cnblogs.com/zhguang/p/Java-JVM-GC.html
查看默认的最大堆设置:
|
1 |
java -XshowSettings:vm |
DevOps
各种事故都差不多经历过的人来现身说法。
1,背诵《道路交通安全法》,并严格遵守。
2,把车险买最高额度。否则,万一出大事,可能不够赔偿。
3,对教练的话要烂熟于胸,并形成条件反射,像狗见了骨头就流口水一样。把驾驶技术练好再上路。
4,如果撞墙上了之类的,保护好现场,报保险公司即可。
5,撞车,没有人员伤亡,保护现场,报警及保险公司,如果责任在你,警察调解,赔偿金额在1000以内,最好是接受,否则,警察扣车一天的停车费100(不要听信网上转的,扣车不可能不交停车费就能够把车取出来),还有拖车费200起步上不封顶,警察给你出具责任认定书并盖章收费200,一般情况付出的代价会更大。超过1000才划得来让保险公司赔偿。如果责任在对方,随便你公了私了。
6,撞伤人,保护现场,报警及保险公司。送医,一切听警察安排就好,伤者狮子大开口讹人是没有用的,保险公司该怎么赔就怎么赔。
7,撞死人,不要逃逸,保护现场,报警及保险公司,送医,死了也得送医。然后警察首先会把你控制,并要求你拿20000左右的丧葬费,再然后让你拿出一定数额的赔偿金把你取保候审。照办。赔偿是有标准的,以华中地区为例,农村户口年6000左右,城市户口10000多点,乘以年龄,再加抚养费赡养费等,还有20000以内的精神损失费(这个保险公司不赔,你自己认倒霉的)。这样做了最多被关押24小时,就不会被看守所关几个月了,也不用花一大笔冤枉钱去打点公检法。然后会判个一年左右的缓刑,罪名是过失致人死亡,不用坐牢。主动赔偿,早点取得对方家属谅解,金额警察叔叔早就给你算好了,有盖公章的票据,保险公司认赔,千万不要死扛,那样只会损失更大。千万不要撞死3人及以上,这属于特大事故,无论如何也是要吃几年牢饭的。
8,所有的赔偿都需要责任人垫付,事情了结后半个月内保险公司才能够把款项打你卡上,也就是说想开车上路最好能够24小时内拿出20~40万的现金。
9,听警察安排就好,不要对抗或哭穷,警察的好言相劝通常事不过三,兔子急了还口交人,何况公共安全专家乎。一般不会有潜规则什么的,即便有,也比明规则廉价,几条烟,两顿饭不算什么。
10,再重复一遍,一定要牢牢遵守道路交通安全法,还有夜里和雨雾天气没事儿不要开车溜达,切记。配个行车记录仪很有必要。新手不要买太贵的车。
http://www.cnblogs.com/E-star/p/5460840.html
jstack
jstat
…
http://www.blogjava.net/fancydeepin/archive/2013/09/29/jvm_heep.html
关于新生代,老生代,young gc,full gc 解释的简单易懂
独家许可: 被许可方和许可方都可以使用,不能再有其它方使用
独占许可: 只有被许可方可以使用,许可方自己不能使用
话说strace是运维的利器,可以跟踪进程的所有的系统调用;有一天,运维小明发现tmp目录下意外产生了大量图片文件,并且在不断增多,但是不知道是哪个进程写的,所以更不知道是哪个应用写的,这时候strace无能为力了(其实可以strace所有可以的进程的,有些麻烦)
曾记否,inotify是可以监控文件(目录)的访问(不仅仅是变化)的,其输出类似:
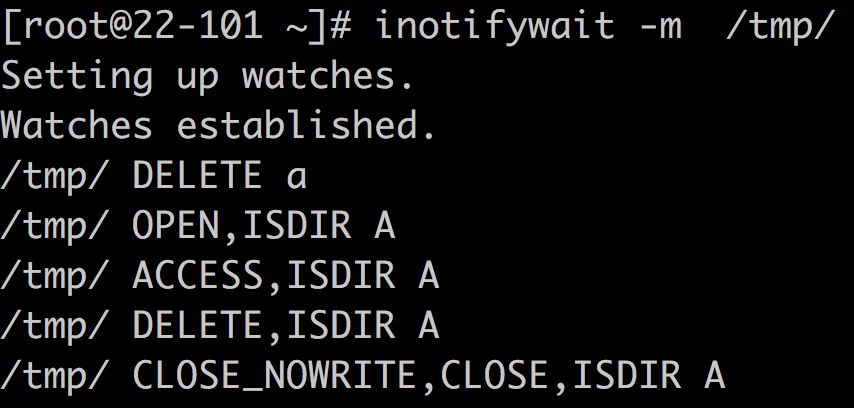
嗯,没有进程信息,咋办?
还有一个神奇: systemtap
参考文档: https://sourceware.org/systemtap/SystemTap_Beginners_Guide.pdf
这里的iotime.stp 可以用来监控文件的变化,而且包含进程信息:
|
1 2 3 4 5 6 7 8 9 10 11 12 13 14 15 16 17 18 19 20 21 22 23 24 25 26 27 28 29 30 31 32 33 34 35 36 37 38 39 40 41 42 43 44 45 46 47 48 49 50 51 52 53 54 55 56 57 58 59 60 61 62 63 64 65 66 67 68 69 70 71 72 73 74 |
#! /usr/bin/env stap /* * Copyright (C) 2006-2007 Red Hat Inc. * * This copyrighted material is made available to anyone wishing to use, * modify, copy, or redistribute it subject to the terms and conditions * of the GNU General Public License v.2. * * You should have received a copy of the GNU General Public License * along with this program. If not, see <http://www.gnu.org/licenses/>. * * Print out the amount of time spent in the read and write systemcall * when each file opened by the process is closed. Note that the systemtap * script needs to be running before the open operations occur for * the script to record data. * * This script could be used to to find out which files are slow to load * on a machine. e.g. * * stap iotime.stp -c 'firefox' * * Output format is: * timestamp pid (executabable) info_type path ... * * 200283135 2573 (cupsd) access /etc/printcap read: 0 write: 7063 * 200283143 2573 (cupsd) iotime /etc/printcap time: 69 * */ global start global time_io function timestamp:long() { return gettimeofday_us() - start } function proc:string() { return sprintf("%d (%s)", pid(), execname()) } probe begin { start = gettimeofday_us() } global filehandles, fileread, filewrite probe syscall.open.return { filename = user_string($filename) if ($return != -1) { filehandles[pid(), $return] = filename } else { printf("%d %s access %s fail\n", timestamp(), proc(), filename) } } probe syscall.read.return { p = pid() fd = $fd bytes = $return time = gettimeofday_us() - @entry(gettimeofday_us()) if (bytes > 0) fileread[p, fd] += bytes time_io[p, fd] <<< time } probe syscall.write.return { p = pid() fd = $fd bytes = $return time = gettimeofday_us() - @entry(gettimeofday_us()) if (bytes > 0) filewrite[p, fd] += bytes time_io[p, fd] <<< time } probe syscall.close { if ([pid(), $fd] in filehandles) { printf("%d %s access %s read: %d write: %d\n", timestamp(), proc(), filehandles[pid(), $fd], fileread[pid(), $fd], filewrite[pid(), $fd]) if (@count(time_io[pid(), $fd])) printf("%d %s iotime %s time: %d\n", timestamp(), proc(), filehandles[pid(), $fd], @sum(time_io[pid(), $fd])) } delete fileread[pid(), $fd] delete filewrite[pid(), $fd] delete filehandles[pid(), $fd] delete time_io[pid(),$fd] } |
这个脚本用来干这事儿,逻辑有些多,杀鸡用了牛刀,不过至少可以解决问题