关于mactap的使用
在使用neutron的provider网络时,使用linuxbridge做驱动,配置是这样的:
提供一个设置了IP的网络设备(不能是bridge)
当启用该网络时,linuxbridge会创建一个bridge,将配置中的IP配置到该bridge上,然后,把配置的设备插到该bridge上
其实,我不想把宿主机上唯一的网卡给neutron,于是:
- 在宿主机网卡上配置一个bridge
- 把宿主机IP配置在该bridge上
- 创建一个设备对儿
- 设备对的一端叫veth@br0,插到上面创建的bridge上
- 设备对儿的另一段叫veth@neutron,配置一个IP,把该IP和veth@neutron写到neutron的配置文件中
这样neutron只需要操作veth@neutron就行了
这样基本是可以的,唯一的问题在于veth@neutron这个名字里面的@不招待见,neutron服务会报错, 修改个名字就行了
续: veth@br0 的命名也是会遭到抵制的,在使用ip link list的时候,会出现这样一个设备:
|
1 2 |
veth_neutron@veth@br0 veth@br0@veth_neutron |
似乎@也是一个特殊字符,如果@出现两次,则linuxbridge代码中会出现异常,如下:
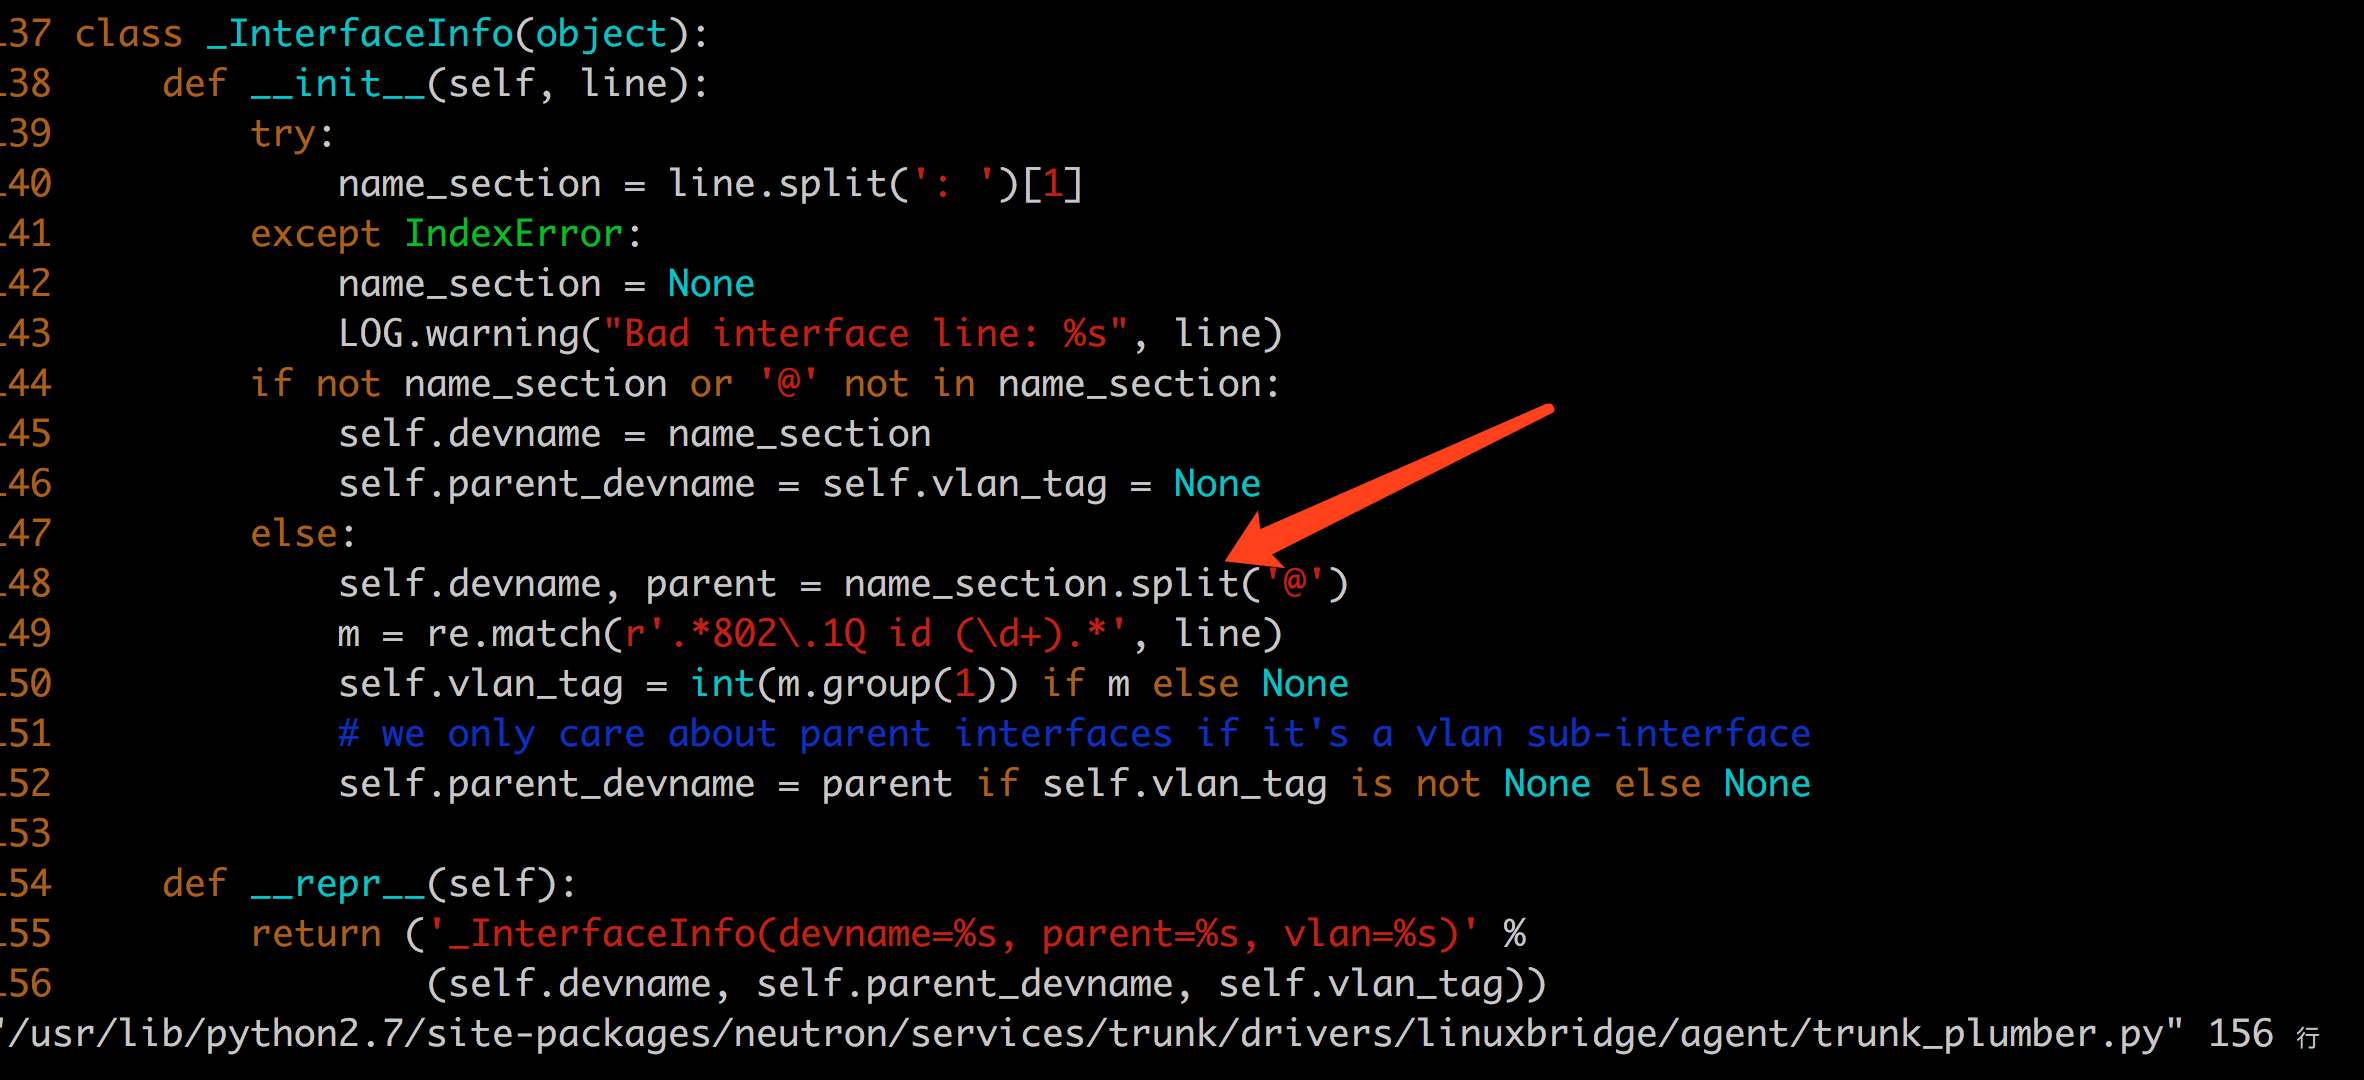
显然,这里只觉得设备名称最多有一个@
相关脚本:
|
1 2 3 4 5 |
ip link add veth_br0 type veth peer name veth_neutron ip link set veth_br0 up ip link set veth_neutron up brctl addif br0 veth_br0 ip addr add 10.88.10.25 dev veth_neutron |
网卡绑定实践
需求:
期望通过绑定多块网卡提高吞吐量,哪怕是只有一对机器之间的访问,最好也能提高吞吐量。
实践:
服务器上绑定em0 em1; 使用round-robin模式,确实能看到服务器发出去的数据包是在两个网卡间交替进行的,ping一个地址就能看到;
交换机需要做端口聚合设置,使用的是H3C S5500-48P-SI , 负载均衡模式中没有round-robin,只能根据mac、ip地址之类进行负载均衡,于是乎,对于单个连接来讲,进入服务器的流量其实是不均衡的。
为什么h3c不提供round-robin ?
vCPU configuration. Performance impact between virtual sockets and virtual cores? – frankdenneman.nl
mac 无法安装来历不明的文件
朋友从微信给我发送了一个软件,到苹果上就是不让安装: 10.12版本的mac上不让信任任意开发者了:
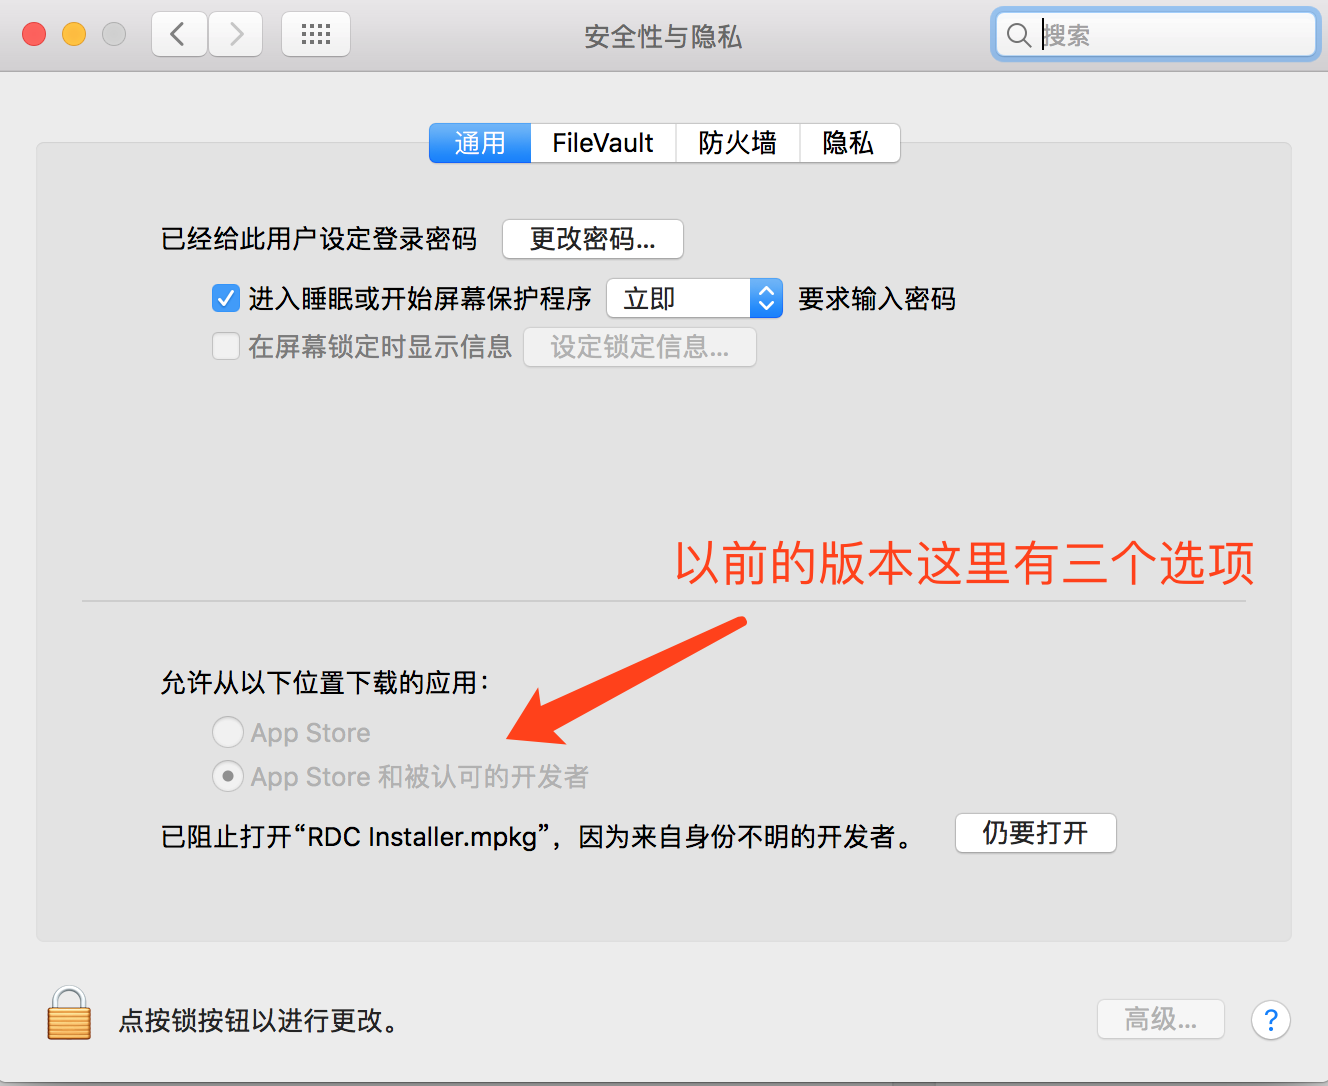
解决办法:
通过cat命令变成一个新的文件,就能正常安装了
openstack kvm 磁盘限速
设置:
读写最大10MB/s,iops最大50/s
- 设置flavor, 在flavor上添加属性
|
1 |
# openstack flavor set m1.medium --property quota:disk_read_bytes_sec=10240000 --property quota:disk_write_bytes_sec=10240000 |
|
1 |
#openstack flavor set m1.medium --property quota:disk_write_iops_sec=50 --property quota:disk_read_iops_sec=50 |
- 通过virsh dumpxml验证:
|
1 |
virsh dumpxml instance-00000058 |

- 验证

关于对卷的限速: http://ceph.com/planet/openstack-ceph-rbd-and-qos/
The disk I/O options are:
disk_read_bytes_secdisk_read_iops_secdisk_write_bytes_secdisk_write_iops_secdisk_total_bytes_secdisk_total_iops_sec
参考: https://docs.openstack.org/nova/pike/admin/flavors.html
对于单独创建的卷来讲,可以在创建卷时指定卷类型,而卷类型可以预先关联已定义好的qos规格的,如:
注意:
- 对于创建虚拟机时使用新建卷的情况,该限速没有被应用,应该是bug吧
- 官方文档的一点儿要问题

- openstack的dashboard上也有一些误导的地方:
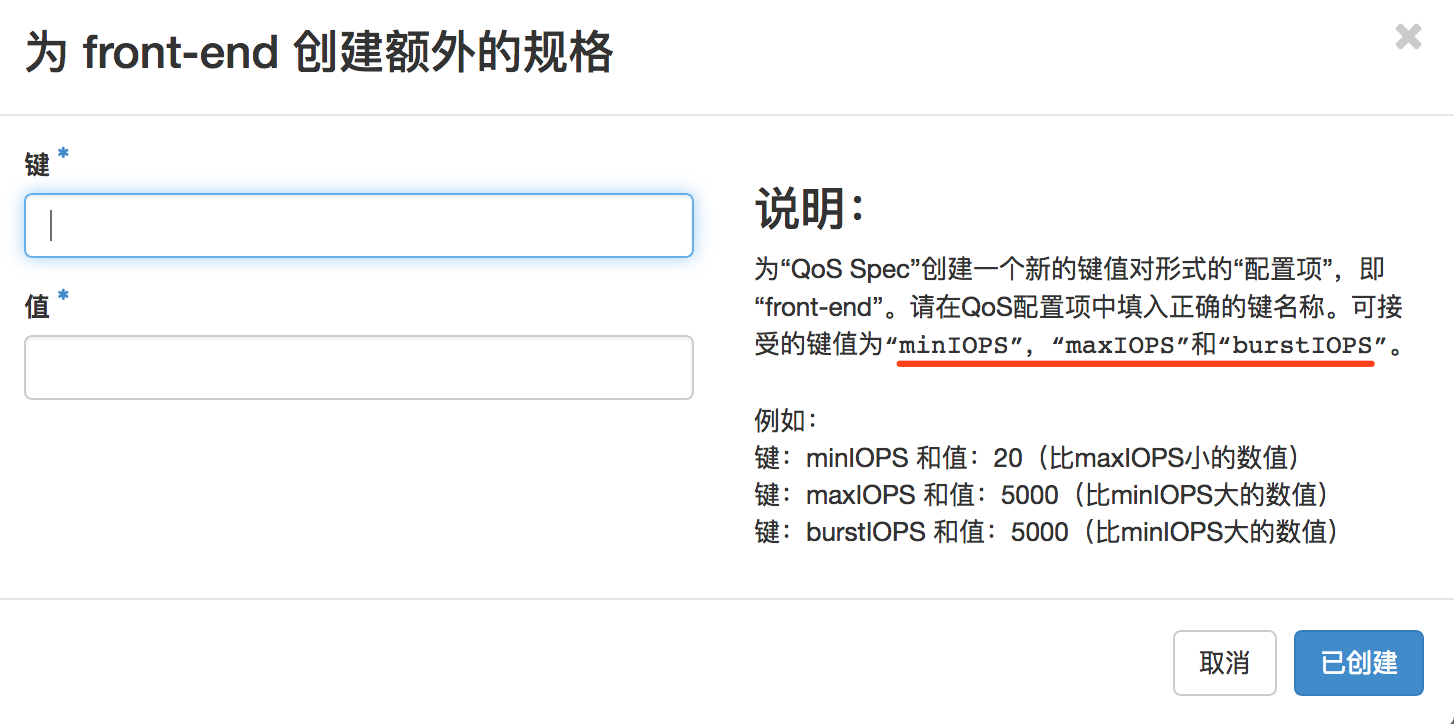
这里的提示仅仅可以当做是示例,真正需要什么就写什么就行了,如,关于磁盘限速的相关键为:read_bytes_secread_iops_secwrite_bytes_secwrite_iops_sectotal_bytes_sectotal_iops_sec
注意: 这里不需要上面所谓的 disk_ 前缀
cephfs
- 一个cephfs可以add多个data pool,下面以单独的名为cephfs_data 的data pool为例说明
- 每个文件系统中的文件都在cephfs_data 这个pool中产生前缀相同的多个object,如:

产生3个rados object

三个对象分别在不同的pg、不同的osd上:

- 文件删除后,rados object会不立即消失,至少是一个异步的过程,可能几秒后才被删除
ceph 架构
关于osd的主从复制:
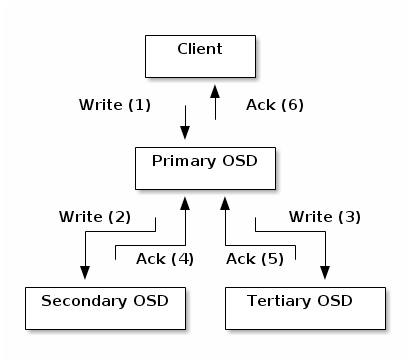
说明:
- 如此架构,写入性能取决于三个osd中最慢的osd的性能,似乎有些不妥;不过,每个osd都在同时担任多种角色,就不应该允许有问题的osd提供服务;另外,有工具可以发现那个osd响应慢
在一共4台机器,13个osd的情况下,某osd已经和其它osd创建了60个连接了:

ceph 之 cephfs认证权限问题
题记:
尽信书则不如无书
按照书上说的配置完cephfs后,无法mount成功,ceph-fuse的错误信息为:
|
1 |
handle_connect_reply connect got BADAUTHORIZER |
mds 日志错误信息为:
|
1 |
mds.client.cephfs ms_verify_authorizer: cannot decode auth caps bl of length 0 |
从代码来看,就是caps给的不够。
书上关于caps的命令为:
|
1 |
#ceph auth get-or-create client.cephfs mon 'allow r' osd 'allow rwx pool=cephfs_metadata, allow rwx pool=cephfs_data' |
实际上,还需要添加关于mds的授权,如果对mds之授权r, 则可以挂载,但是不可写;所以正常情况下,需要添加对mds的rw,更新授权信息如下:
|
1 |
# ceph auth caps client.cephfs mds 'allow rw' mon 'allow r' osd 'allow rwx pool=cephfs_metadata,allow rwx pool=cephfs_data' |
如果我们只想让client.cephfs 访问 /data 目录,则可以添加更新授权信息如下:
|
1 |
# ceph auth caps client.cephfs mds 'allow r, allow rw path=/data' mon 'allow r' osd 'allow rwx pool=cephfs_metadata,allow rwx pool=cephfs_data' |
注意: 这里似乎并未指定是哪个fs,如何区分不同的fs呢?
关于限制用户访问指定目录的问题,有更加方便的做法: http://docs.ceph.com/docs/master/cephfs/client-auth/)
eg:

其实,该操作也是反映在ceph auth里面的,如下:

如此来看,具体是哪个cephfs,其实不是本质的东西,本质上还是对pool的授权
另外:ceph fs authorize 命令目前似乎不能操作现有用户(不能修改、也不能删除),该命令只能添加新用户;需要修改删除啥的还是要使用ceph auth的
下面使用client.phpor 尝试挂载,验证权限是否生效:

权限设置生效
结论:
- 别忘了cephfs对mds添加授权
- 修改完caps后,需要重新mount才生效
关于授权这部分,官方文档似乎并未提及
参考:http://www.yangguanjun.com/2017/07/01/cephfs-client-authentication/
openstack with ceph
前言
openstack是个很不错的东西,结合ceph之后,openstack就如同插上了翅膀,更加强大了。
ceph的好处:
- 有了ceph这个共享存储,guest的热迁移就方便多了
- ceph提供的块儿存储支持snap和clone,是的创建虚机和快照都不用copy磁盘,使得创建虚机可以秒级完成,而且非常节省存储
我遇到的问题:
- 在我将openstack和ceph结合起来之后,创建虚机依然很慢,并没有达到创建虚机不复制磁盘的效果
解决办法:
- 调试虚拟创建过程,发现如果要利用上rbd的snap和clone的特性,需要在image上有location属性;然而,我创建的image并没有该属性,openstack image命令行没有location相关选项,dashboard上创建镜像也没有该属性,只有glance命令行允许指定或单独添加该属性,却又报location invisible的错误;临时解决办法:直接修改代码,在代码中添加:

- 关于glance设置location失败的问题,根据关键字去glance代码中查看代码,发现当配置文件中的show_multiple_locations = false时,是不允许操作location的:
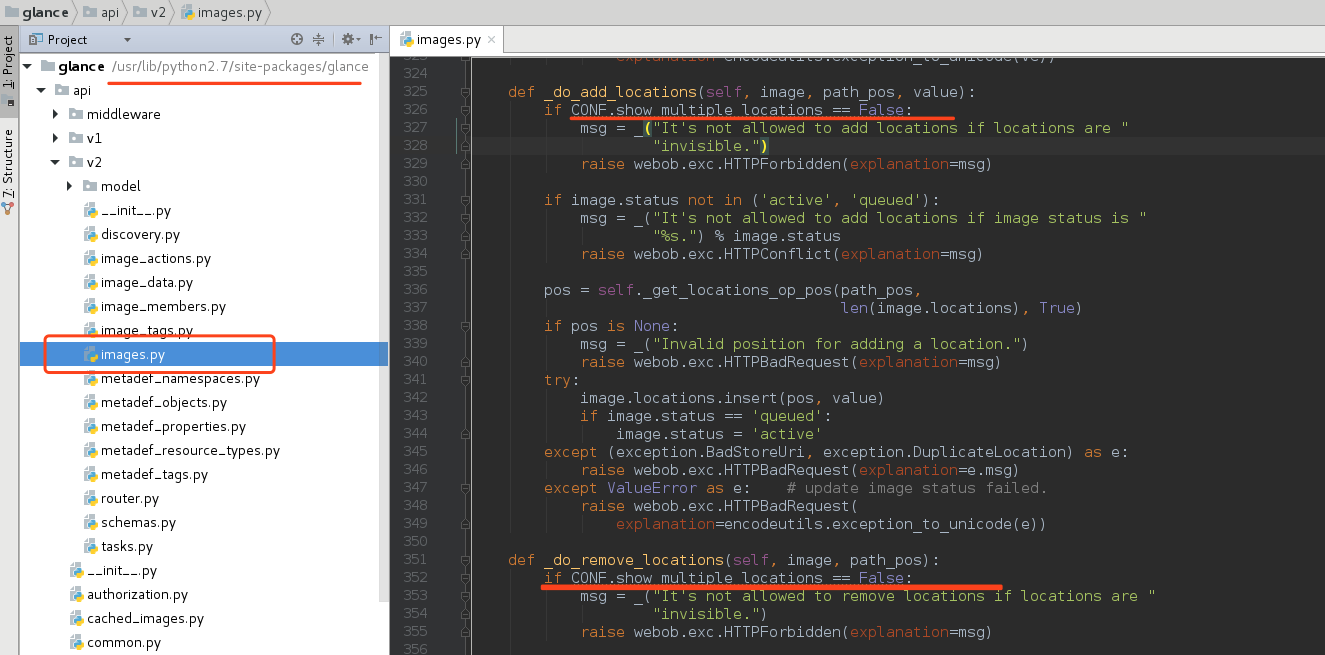
然后,去glance-api的机器上grep show_multiple_locations ,并修改为True,重启glance-api 服务;然后再尝试location-add,提示url已存在,其实,该信息本来是存在的,只是显示与否的问题,现在不需要做任何操作,已经可以从image的信息中看到url了,如下:

参考配置文件 /etc/glance/glance-api.conf 得知,show_multiple_locations = True使得image的地址直接暴露给了client,client就可以直接操作image了,可能存在一定的安全问题;当我们认为这不是问题的时候,我们就可以修改该配置,现在,我正是想利用rbd的一些特性,就需要将给选项设置为True;
- 至此,纠结已经的问题正式告一段落
总结:
- 按照手册安装openstack没有太大意义,能发现问题并解决问题才能进步;在解决该问题的过程中,尝试了python的单步调试(效果很差)、从代码上了解了虚拟机创建的过程,也了解了一些glance的代码,受益匪浅